CLICK HERE FOR FREE BLOGGER TEMPLATES, LINK BUTTONS AND MORE! »

Monday, August 29, 2011

Map It Monday - A Famous Mouse

I recently created a fun birthday card for a four year old.  Who doesn't love Mickey Mouse?!


I'm using some more sweet pastel retired designer series paper.  It might be several years old, but I still can coordinate it to other Stampin' Up products!   I love that!


NOTES:
cs:  Whisper White, Basic Black, Blushing Bride
dsp:  Spring Fling dsp (very retired, so I think that's the name!)
inks:  Classic Stampin' Pad - Basic Black; Stampin' Write Markers - Pretty in Pink, So Saffron, Certainly Celery, Peach Parfait
stamps:  Bring on the Cake
punches:  Circle - 1 3/4", 1", 1/2", 1/4"
other:  Pink Pirouette striped ribbon (retired)
How Did I make Mickey?   I punched two 1 3/4" circles, one from Basic Black cs and one from Blushing Bride cs.  I penciled the Mickey's "hairline".  It is easy to hand draw this - they are just like little mountains!  Then cut on the pencil lines with trimming scissors or paper snips.  Adhere the Blushing Bride face atop the 1 3/4" black circle.  Then, simply trim the white eyes into ovals and adhere the other punched pieces!  I drew on the mouth with the thin end of a Pretty in Pink Stampin' Write marker.


This was a fun card to make!  And, it was so easy!


Linda


Friday, August 26, 2011

Fast Friday - Petal Candy


Here's a quick little candy treat pocket that I made with the Petal Card Big Shot Die.  There are two different quick styles today.  If you do not own the Petal Card Die (it is now retired - gotta get them while we can I guess!), there are other die alternatives for little candy pockets.  You can also make a similar candy pocket using Stampin' Up's Big Shot Bitty Box & Envelope Bigz XL Die, Candy Wrapper Bigz Die, Petal Cone Die Bigz L Die, Pillow Box Die, or even the Scallop Envelope Bigz Die!     
The pink cs is run through the Big Shot machine with the die, then cranked through the Big Shot a second time inside an Embossing Folder.  This gives the cs texture and pattern!


The stamped message image is from the new stamp set in the 2011/2012 IB&C called It's a Wrap!  The images are intended to be easily stamped and then wrapped around chocolate foil wrapped nugget candies, but as you can see, there are other uses too!  The images create nice labels!


The Button, Button stamp set is a nice little embellishment to stamp and attach to just about anything - simply punch it with a circle punch & adhere with a Stampin' Dimensional!  It would be a great addition to a greeting card when the card seems to need a little something extra to pull it together!


The jewelry tag punch creates a tiny frame for the mini thank you message!  Just tuck it under the button!

The designer series paper is a retired design - what a great project to use those saved scraps on!


Happy weekend!


Linda


Thursday, August 25, 2011

Think About Color Thursday - Real Red, Old Olive, Gray


I know, it's a strange color combination:  Gray, Real Red, Old Olive !  But, it works, don't you think?


I'm thinking.......Sweetest Day or anniversary.......even a birthday would be a suitable occasion for this heart flower card!


NOTES:
CS:  gray, whisper white, real red
dsp:  old olive pattern, love impressions (Occasions Mini 2010, retired)
stamp set:  Filled With Love (2010 Holiday Mini Catalog, retired)
ink:  Stampin' Write markers - real red, old olive
ribbon:  old olive 1/4" grosgrain
other:  bitty button (clear), hemp twine, glue dots


Have a great day!


Linda

Friday, August 19, 2011

Fast Friday - Tagtastically Homegrown


You may remember the "Tagtastic" card that I posted on my blog recently.....Well, I like the style of that card so well that I created a set of coordinating cards!

Each card was simple and quick - perfect for a Fast Friday post!  I really like the boldness of the colors and the Tagtastic and Homegrown stamp sets!

Have a great weekend!

Linda

Thursday, August 18, 2011

Think About Color Thursday - Blushing Bride and Whisper White


COLOR COMBINATION OF THE WEEK:
BLUSHING BRIDE
WHISPER WHITE


At last night's stamp camp we learned some new stamping techniques.  This card was created with a technique that I call "soft washing".  I'm not really sure what to call it so I named it that because the technique softens the card and reminds me of a white wash.  This card has quite a bit going on, including Versamark ink, heat embossing, as well as sponging and emboss resist techniques.


Didn't it turn out absolutely beautiful?!   Just stunning!

The background pattern on the card is stamped with one of Stampin' Up's new background stamps called Parlor Prints (in the 2011/2012 I&C).  The Decorative Label is stamped with one of the stamps in the Four Frames stamp set


PARLOR PRINTS = MY NEW FAVORITE STAMP!!!!!!

Have a great day!


Linda


Wednesday, August 17, 2011

Whatever Wednesday - Lattice Quilting

A handmade quilt is a thing of beauty.  So is a handmade quilt card.  Tonight at stamp camp the ladies made six cards, one of which was today's card post.


NOTES:
stamp set:  2011/2012 IB&C Faith in Nature Hostess Set (on page 15 of the new big catalog!)
cs:  So Saffron, Always Artichoke, Whisper White
dsp:  retired Le Jardin dsp (retired 2008 IB&C)
other:  Big Shot diecutting machine, Lattice Bigz Die, Textured Impressions Square Lattice Embossing Folder, 2-way glue pen, Stampin' Dimensionals
How did she do that?  First, I die cut a lattice with the Stampin' Up Big Shot Lattice Bigz Die from both So Saffron card stock and Le Jardin double sided designer series paper.  The So Saffron lattice is adhered onto an Always Artichoke cs square.  Then, it's time to insert the tiny quilt pieces of dsp into the So saffron "puzzle base", just as I would put a jigsaw together.  The 2-way glue pen works well for this task - just a dab under each puzzle piece is all it needed.  The last step is to crank the completed quilt "puzzle" through the Big Shot machine inside the Square Lattice embossing folder.  That last step is called "embedded embossing", because the process actually embeds the little pieces into the base.


Wouldn't this card be a fantastic choice to give to a quilter or seamstress, or to a quilt collector?!


Thanks for visiting my blog!


Linda

Monday, August 15, 2011

Map It Monday - Artichoke Artistry


Doesn't the Ornate Blossom stamp resemble an artichoke?  I paired it up today with the artichoke from the Homegrown Stamp Set.   And who said that red and green are only paired together for the Christmas holidays?

The map is composed of simply an angled main image with an angled embellishment!


NOTES:
stamp sets:  Homegrown, Ornate Blossom
card:  Poppy Parade
other cs:  Whisper White
inkpads:  Classic Stampin' Pads - Always Artihoke, Poppy Parade, Real Red, Pear Pizazz
ribbon:  1/4" grosgrain - Always Artichoke, linen thread
punch:  spiral (oooh, just noticed it has retired - I hope you have one of these!)
other:  distressing kit, Stampin' Dimensionals,
Technique Talk:  Shadow stamping for the artichoke was done in Always Artichoke and Pear Pizazz, and the tomato was shadow stamped with Real Red and Poppy.

Linda


Friday, August 12, 2011

Fast Friday - Mixing of Old and New


This week's Fast Friday card is simply Designer Series Paper (retired Sweet Pea stack) tiles adhered to the card, with a diecut flower and simple stamped round image in the center.  The rounded corners of dsp located at the four corners of the card have been rounded with a corner punch to soften it a bit and work with the round polka dots.


The Pumpkin Pie diecut flower is a retired Stampin' Up product, not a punched flower.  

Do you have bits and pieces of Stampin' Up products hanging around the stamping room?  The beauty of Stampin' Up's color collections and prior color families is that you can still use products that have been around for years!  Pair up whatever products/papers/inks that you have left over after their retirement with current stampin' Up colors!  In this case, Pumpkin Pie is a current color, though the diecut flower shapes are retired.  The Concord Crush card is a current In Color that compliments Pumpkin Pie so well!


Linda

Thursday, August 11, 2011

Think About Color Thursday - Peach Parfait and Very Vanilla


One of my dear customers is getting married very soon!  Recently I attended a bridal shower and designed today's card for her.  I've seen and stamped his/her towel cards before, but this one is so beautiful that I wanted to share it with you!


NOTES:
The Card - I cranked theVery Vanilla card front only through the Big Shot Machine with the Vintage Wallpaper Embossing Folder.
Towel Bar - The towel bar is simply a strip of dark cs cut to the desired size.  Pearl brads are also adhered on the ends to add even more bridal elegance.
Towels - Peach Parfait cs is embossed using the Big Shot Machine and Perfect Polka Dots Embossing Folder.  I thought the Chantilly Lace Trim Ribbon woven through the towels would look elegant.  I cut slits in the "towels" in a paper cutter/trimmer and simply weaved the lace ribbon through the slits, adhering on the back of the cs towels.  The bottom lace hemline is simply the lace adhered onto the edge of the cs "towel".  The towels are adhered using Stampin' Dimensionals.


I would love to see your card if you create one like this for your next bridal shower!


Linda

Wednesday, August 10, 2011

Whatever Wednesday - Fishy Ornament Punch


My Stampin' Up "wish list" for quite a long time has included the ornament punch.  Finally, I have purchased it and have found that it is fun to use this punch for other projects besides Christmas ornaments!  These little fishes are actually punched with the ornament punch!


Polka dotted patterns dsp in both the new "in color" of "Wisteria Wonder" and "Island Indigo" are the main attraction on today's Wild Wasabi card.  Stampin' Up's new polka dot brad (also in Wisteria Wonder!) coordinates beautifully! 


Once I punched the ornament with the ornament punch, I cut off the top rim of the ornament and turned the ornament sideways.  The Five Petal punch is used for the back fin.  The side fins can be punched and cut from your choice of several different punches, including the Scallop Edge Border Punch, the Scallop Square Punch, the Scallop Circle Punch, the Scallop Oval Punch, or the Petite Pennants Builder Punch.  You can certainly use your creativity with your fish!


Check out the new 3/8" Wisteria Wonder ruffled ribbon!  The ruffled ribbon is also available in the other new "in colors"!


Can you think of anything else to make with the Stampin' Up ornament punch?!


Linda

Friday, August 5, 2011

Fast Friday - Tagtastic Olive Card


It's hard to believe how many Fast Fridays there have been during this fast summer!  It doesn't seem possible that August is here already and school will once again be in session.


Have you seen the "Tagtastic" Hostess stamp set on page 13 of the current Idea Book & Catalog?  It sure is a bargain at $10 hostess dollars!  Today's card features the "congrats" stamp from this set.


The vibrant colors bring this simple card to life and several Stampin' Up paper punches make creating this card easy and quick!


Linda

Thursday, August 4, 2011

Think About Color Thursday - Early Espresso, Tempting Turquoise, Basic Black


Remember this musical note designer series paper that was in the recently retired IB&C?  I thought that since teenagers love music, it would be a great choice for a teenage birthday card!


The color combo this week:


Tempting Turquoise
Early Espresso
a touch of Basic Black


I have really been having fun with the new Stampin' Up pennant punch.  Today's card features 3 triangle flag pennants punched from Tempting Turquoise patterns designer series paper.  Notice the little half inch polka dot circle inside each flag?  A nice touch of whimsy!  


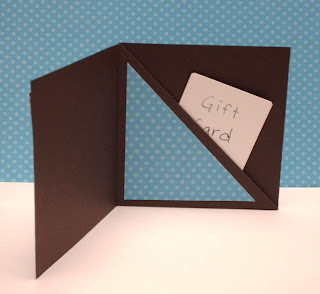
The dsp is adhered with dimensionals onto the card front.  The interior has a pocket for the perfect gift for a teen - cool cash, a check, or a gift card!  What teenager wouldn't love that?!


Linda

Wednesday, August 3, 2011

Whatever Wednesday - Follow My Blog!

I recently included tools on the right hand sidebar of this blog so you can follow my blog with each posting!  Now, I need followers!  Won't you help me out here?!  Be one of my blog followers!

C'mon now!  I know I have friends out there!

Happy stamping!   I hope to post again later today with a stamping-related project!

Linda

Tuesday, August 2, 2011

Tuesday Tips - Pop Up Every Other Image AND Long Tag Layering

Hi Stampers!


Tomorrow is stamp camp and we are stamping cards for every age group.  The new baby card we will create is my posting for today.  My tip for the week:  Use a Stampin' Dimensional on every other image when you have a row of images to add interest!


The ducks and teddy bears here are adhered across the card front, however, a Stampin' Dimensional pops up every other image.  Fun!  The message is also layered onto Stampin' Dimensionals.


NOTES:
cs:  Peach Parfait, Pear Pizzazz, So Saffron
other paper:  Pear Pizzazz Patterns DSP, watercolor paper
ink:  Black Stazon inkpad; Stampin' Write markers - So Saffron, Pear Pizzazz, Peach Parfait, Creamy Caramel (retired), Soft Suede
punches:  1" circle, Decorative Label
other:  Stampin' Dimensionals
How I created the layered tag:  So Saffron cs strip is 1 5/16" wide.  Pear Pizzazz dsp strip is 1 3/8" wide.  I stamped the message onto the So Saffron strip, centered the message & punched one end at a time with the Decorative Label punch.  The trick to punching a longer message with a punch that isn't quite long enough is to insert the paper from the bottom of the punch through the center.  I was using the Modern Label punch today & thought some photos of this technique would be helpful for you.  The Decorative Label punching that I did for today's card followed the same technique as used with the Modern label punch.  After both ends are punched separately, I adhered the message onto the Pear Pizzazz dsp mat & punched both ends again.   Adjust both ends to allow for a thin or thick outer mat style.


Insert paper thru center of punch bottom & punch

One end after using modern label punch


then punch other end in the same way


I guess I've given you two Tuesday tips today!  Why not give both this "long tag layering" AND "adding dimensionals to every other image" a try!

Linda