Tuesday, March 31, 2009
TUESDAY TIPS - Designer Grass
Cs: kraft brown, Chocolate Chip, Whisper White
Dsp: any green patterned paper
Inks: Chocolate Chip, Wild Wasabi
Other: Stampamajig
This stamp set called Trendy Trees is such a great set for a masculine card. Here I have hand cut some dsp on a curve to resemble a grassy hill. I just love the look. Save your green dsp scraps & try it!
Arrange the “hill” onto the white cs without adhesive in order to figure out exactly where to stamp the tree trunks. The "hill" is then removed for the stamping of the tree trunks. Using a Stampamajig makes lining up the treetops quite easy.
Linda :)
Monday, March 30, 2009
MAP IT MONDAY - Wild Hippo
RECIPE -
Cs: Wild Wasabi, Whisper White, Basic Black
Dsp: Non S U plaid
Inks: Black Stazon Inkpad, Wild Wasabi Classic Stampin’ Pads, Watercolor Wonder Crayons -
Punches: Circles – 1”, ½”, 1 3/8”
Other: Aqua Pen, Watercolor Paper
Watercolor the hippo on watercolor paper using a gray Watercolor Wonder Crayon from the Neutrals package. Have you seen the technique pages on the Stampin' Up website? For this hippo image, Watercolor Technique "C" is used" for the gray color, and Watercolor Technique "D" is used for the green color.
After the watercoloring, this card is finished simply by adhering all the layers.
Saturday, March 28, 2009
SCRAPBOOK SATURDAY - Seasonal Paper
FAST FRIDAY - Yummy Sale-a-Bration
Thursday, March 26, 2009
THINK ABOUT COLOR THURSDAY - Mellow Moss, Always Artichoke, Close to Cocoa
I absolutely adore this new stamp set called Thoughts & Prayers. It has this gorgeous tree and a branch with little leaves & flowers. It has six very appropriate messages for both sympathy and "get well". This sympathy card includes one of those beautiful messages inside: "Praying for friends to comfort you, faith to uphold you, and loving memories to heal your heart."
Linda :)
Wednesday, March 25, 2009
WHATEVER WEDNESDAY - Punched Ribbon Flower
Attach the tag to the card with sturdy dimensionals. Adding extra dimensionals will help to make sure that the ends of the ribbons don't loosen.
Tuesday, March 24, 2009
TUESDAY TIPS - Tiny Pinwheel
Linda :)
Monday, March 23, 2009
MAP IT MONDAY - Daisy On My Mind
A Pretties Kit flower adorns today's card. I didn't really like the map after I created it, but I guess I was wrong because I sure like the card. I punched a Chocolate Chip 3/4" circle, distressed the edges, and adhered it along with a Pretties Kit half pearl at the flower's center. The "You're On My Mind" message is sponged on the edges and stamped in Chocolate Chip.
How did the daisies get a second color on the petals? I inked the flower stamp from the Upsy Daisy stamp set with Baja Breeze Blue ink. Then, I used the brush end of a Chocolate Chip Stampin' Write Marker directly onto the rubber - just on the edges of the petals. When you do this, remember to huff breath onto the rubber to remoisten the ink before stamping the image.
I added a few corner piercings onto the Chocolate Chip mat as well.
Linda :)
Saturday, March 21, 2009
SCRAPBOOK SATURDAY - Faux Stitching
The 12 x 12 scrapbook paper is actually the diagonal stripe. I cut the polka dot paper to about 9" & distressed the edges. I then paper pierced around the polka dot paper & faux stitched it using a marker. If you've never done that before, give it a try. Pierce holes, draw with a thin-tipped marker from one piercing to the next piercing, making sure to actually let the marker drop down into that hole in the paper each time. When you are done, it looks like you sewed it!
Tomorrow I will finish working out the projects for Thursday's camp! I'm excited!
Friday, March 20, 2009
FAST FRIDAY - Meow Kitty
Thursday, March 19, 2009
THINK ABOUT COLOR THURSDAY - KIWI KISS, YOYO YELLOW, ONLY ORANGE, WHISPER WHITE
If this doesn't scream "Spring", then I don't know what does! I've used the Good Friend Stamp Set, which has rapidly become my new favorite stamp set (I have so many ideas for using this stamp set!). Pair these stamps with some matching dsp & inkpads in our featured color combination of the day:
KIWI KISS, YOYO YELLOW, ONLY ORANGE, WHISPER WHITE
& you have an awesome card! The striped kiwi ribbon definitely adds a nice touch!
Linda :)
Wednesday, March 18, 2009
WHATEVER WEDNESDAY - Matchbook Card AND Upcoming Camp Sneak Peaks
Matchbook Card
dsp: Afternoon Tea
Cs: Groovy Guava, Chocolate Chip, Whisper White
Inks: Groovy Guava, Sage Shadow
Stamp Sets: Itty Bitty Buds
Other: stapler, paper scorer
CUT, SCORE & FOLD: Cut cardstock at 4 1/4" x 9 1/4". Score cs for this matchbook card at the one and a quarter inch mark,and then at both 5 1/2", & & 5 3/4". Fold on the score lines into a "matchbook". Staple twice across the bottom. FINISHING THE CARD: The tone-on-tone stamping on the card front is done with the card opened up flat. I created the flower planter with the tab punch from Chocolate Chip cs. After punching the tab out, trim across the tab to make the flower planter shape. The dsp strip is adhered over the staples.
If you want to make this card, be sure to register for the April 7 Stamp Camp!
One more sneak peak! The card below is a sneak peak for the March 26th camp! The interior of this card can be stamped with "Happy Easter", "happy birthday" for a child's birthday card, or "feel better" for a get well card (how could anybody receive this card & not smile?)! Email or call soon to register for next week's March 26th camp too!
Linda :)
Tuesday, March 17, 2009
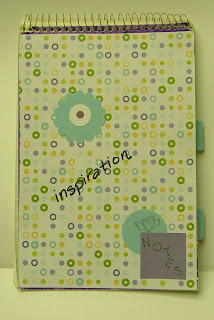
TUESDAY TIPS - Inspiration Notebook
Monday, March 16, 2009
MAP IT MONDAY - Life So Very Sweet
Saturday, March 14, 2009
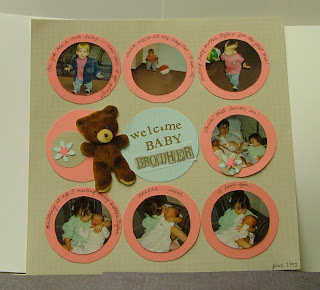
SCRAPBOOK SATURDAY - Nine Circles
A simple layout.
A little monotonous to create, yet strikingly captivating.
The pics really shine in this geometric and symmetrical layout.
A scrap map is unnecessary - just arrange 9 circles! Use a circle cutter to cut photos into circles & to cut mats that are bigger than the photos.
Journal on the circle mats around each photo and add an alphabet sticker title. Punch flower parts from matching paper & add a diecut.
Tada!
Linda :)
Friday, March 13, 2009
FAST FRIDAY - Trendy Coral
Thursday, March 12, 2009
THINK ABOUT COLOR THURSDAY - Certainly Celery, So Saffron, Close to Cocoa
RECIPE:
cs: Whisper White, Certainly Celery, So Saffron
dsp: Patterns dsp - Close to Cocoa
stamp set: Cute & Curly
inks: Classic Stampin' Pad - Close to Cocoa
punches: Curly Label, scallop circle
other: dimensionals, diecut machine, Top Note die
This color combination is so peaceful & natural looking -
Certainly Celery, So Saffron, Close to Cocoa.
What a bright idea! When you run the Top Note die through your diecutting machine, recycle the negative piece (the scrap that usually gets thrown away) to use for another card. Here my Certainly Celery cs negative piece is trimmed & made into a "frame". Brilliant!
The sunflower centers are Designer Series Patterns Paper punched circles that are adhered with dimensionals. "Best wishes" is punched with the Curly Label punch & also adhered with dimensionals.
Are you wondering how the yellow petals are made? Punch cs with the scallop circle punch, cut into each little petal "valley", making sure not to cut too far & not to overlap the cuts.
Linda :)
Wednesday, March 11, 2009
WHATEVER WEDNESDAY - 3D Images
Mat Bashful Blue Patterns dsp onto Basic Black cs & stamp a message at the top. Punch with a slot punch & add ribbon. Adhere this layered piece to the card front.
3-D FLOWER:
Cut out & attach the one flower that was colored entirely. Adhere it to the card front. Next, cut out the flower without the pink border - adhere with dimensionals on top of the 1st flower. The flower's center is created by trimming the center from the remaining flower. Adhere with a dimensional. Now you have a 3-layer 3D flower!
Tuesday, March 10, 2009
Tuesday Tips - Inspiration
I came across the gorgeous soft pink card below that we made at my Valentine's Day camp. I decided to use the same design to make a bithday card.
Tip for the day: Repeat what looks good when your stamping mojo isn't working.
Is there a color combination or design layout that appeals to you? Make it again! Change some element if you want, but stick with a good thing. I was inspired by the pink glittery card. I changed the color to Mellow Moss, changed the image to a cupcake, and changed the location of the message.
To make this card, punch holes in a piece of cs, lay it on your card, stamp through the holes, then adhere the punched cs to the front of a card with dimensionals. Then stamp an image on a punched circle & adhere it with dimensionals.
Monday, March 9, 2009
MAP IT MONDAY - INSPIRED BUTTERFLY
The butterfly was stamped on white cs with Chocolate Chip & colored with Stampin' Write markers. I adhered the butterfly with dimensionals so it looks like it is fluttering above the grass. A white paper clip & ribbon is added for a little whimsy. The paper clip could be replaced with anything - maybe a ribbon, hardware, or button.
I think we might make this card at an upcoming stamp camp!
Linda :)
Sunday, March 8, 2009
SCRAPBOOK SATURDAY - Strawberry Mmm
Linda
Friday, March 6, 2009
FAST FRIDAY - Hello Flower
cs: Brilliant Blue, Naturals White, Elegant Eggplant
ink: Perfect Plum
Stamp set: In the Spotlight
Punches: 1/2 & 1" circle punches
Other: dimensionals, diecut machine, Nestabilities, texture plates
Thursday, March 5, 2009
THINK ABOUT COLOR THURSDAY - Close to Cocoa, Baja Blue, Whisper White
Wednesday, March 4, 2009
WHATEVER WEDNESDAY - Reinkers
ReInkers 101
I recently purchased my first Stampin’ Up reinker. I can’t believe I haven’t bought them until now. I like them so much that I plan to get them in all of my most often used inkpad colors. They are a great thing, so I thought I’d let you in on the secret.
Here's a few things you can do with reinkers.....
1. Flowers can be dyed to match cardstock, embellishments or ink. The first card shown here was made at last week's stamp camp. We used an inkpad and an aqua painter to dye the silk flower. The other card's flower is reinked with a blender pen & reinker.
2. Reink your Stampin’ Up inkpads (of course!) – a refreshed inkpad makes stamping easier (you don't have to press as hard & you get a more solid, vibrant, opaque image).
3. Dye ribbon the same color as your Stampin’ Up cardstock or ink!
4. Reink your Stampin’ Up markers (ingenious!) – well, Stampin’ Up does not endorse reinking markers, so you do run the risk of ruining your marker & having to purchase a new one, but I’ve been told that reinking markers can be done & many people do this. There are several ways to reink a marker. One way is to put a few drops of reinker in a plastic baggie, set the marker (tip down) into the baggie & wait until the marker soaks up the ink. So, if you have a marker that you've used and overused for years, give this a try!
Linda :)
Tuesday, March 3, 2009
TUESDAY TIPS - Don't limit a stamp set to the obvious
Does this card look familiar? This was a card from my February Valentine's Day stamp camp. Sort of.
Take a good look at this card on today's post, then look here at a post I made a couple weeks ago....... Can you spot the differences between them?
I had plenty of Valentine's Day cards, yet not enough sweeties, lol, so I reworked the theme of that card. I pulled off some of the originally intended messages and images and replaced some of them with baby things and a congratulatory baby message. I am so impressed with myself on this one (one more lol). My wheels have been turning ever since I made this baby card because there are probably so many unvalentine ideas to come up with for this stamp set! If you think of any others, I'd love to hear your ideas. I double dare ya!
Linda
Monday, March 2, 2009
MAP IT MONDAY - Dazzling Diamonds Cupcake Circle Card
Cute map, huh? And, don't you love the bling on this cupcake? I used Dazzling Diamonds glitter. We made this card at the last card camp!
RECIPE:
cs: Green Galore, Whisper White
stamp set: Crazy for Cupcakes, large solid surface stamp
paper: Tempting Turquoise Patterns dsp
inks: Black Stazon Inkpad, Stampin' Up markers, VM inkpad
other: Heat & Stick Powder, Dazzling Diamonds Stampin' Glitter, stampin' dimensionals, ribbon, circle cutting system, scoring & cutting blades
Make the card:
Stamp & Apply Color to Cupcake: Stamp image onto white cs with Black Stazon inkpad. Color with Stampin' Up markers.
Heat & Stick Powder & Dazzling Diamonds:
Apply VM ink to the area where you want glitter. Any large solid stamp can work well for applying VM. Heat & Stick powder gets sprinkled next. Heat with heat tool, sprinkle Dazzling Diamonds glitter onto the sticky area, then heat set one more time. Cut out the cupcake. Finish the Card:I adhered Designer Series Patterns Paper circle in Tempting Turquoise to the card front, added the cupcake with dimensionals, cut a slit in the card with a cutting blade, & added ribbon through the slit.Linda :)